She comes to life
Have you been following the "work in progress" portrait on my facebook page last week? It has been such fun painting and sharing the process with readers at the same time. A challenge for sure, but very exciting... On Facebook I only shared the portrait part of the painting. I've been working on the background some more and it's finally done! So today I'd like to share the whole painting with you: it's called Gentle Heart.
Below you'll find slide-show and a recap of all the different steps from start to finish, including techniques. And as always, I look forward to reading your comments and answering any questions you may have, technical or otherwise. Enjoy!

Gentle heart, Mixed media painting on canvas © 2014 Laly Mille
First, a peek at my portrait toolkit!
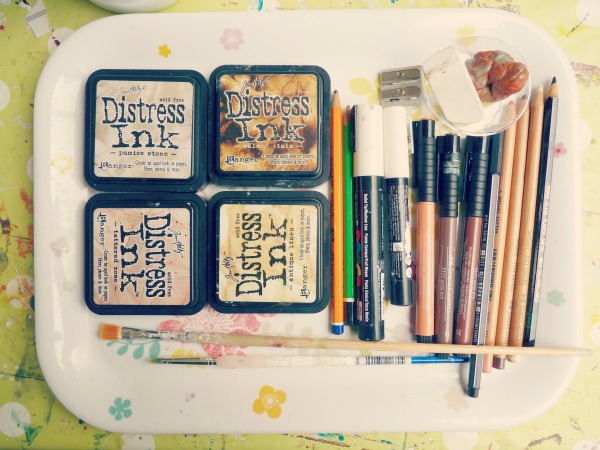
portrait toolkit
And then, it all starts like this...
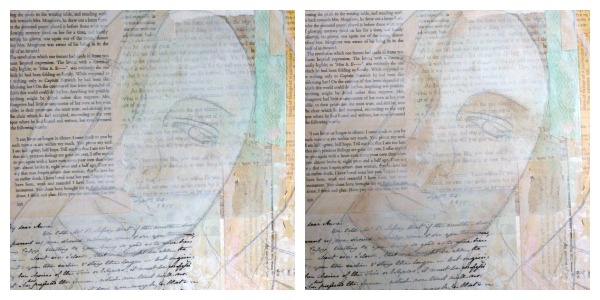
Steps 1 & 2
Step 1: I start with lightly sketching the main features with a pencil, then add a light wash of white acrylic paint to the "skin" areas.
TIP: if you're not comfortable drawing, take a photo you like and print it the size you want the portrait to be. Roughly cover the back of the paper with a 2B or 3B pencil, then place it on your canvas (image facing you) and trace the features with your pencil on the photo: they will transfer to the canvas.
Step 2: Roughly shading with "walnut stain" Distress ink, using my fingers.

Steps 3 & 4
Step 3: Awakening her soul right from the start... Watersoluble black Stabilo All pencil + matte gel medium on a super fine brush.
Step 4: More shading, again with Distress inks in "walnut stain" and "old linen", using fingers and a small brush. I love the transparency of those inks, which allows the text underneath to show through...

Steps 5 & 6
Step 5: Shading some more and adding color to the lips with Pitt Artist pens (B, brush tip) #189 & #169. These are India ink pens. I add tiny touches of color, then move it around with a super fine, wet brush. And highlighting some areas with a white Posca paint pen and a paintbrush. At this stage the nose is way too round for my taste!
NB: Distress inks are water-soluble, which means that you should work with a dry brush or finger. BUT you can also use this to your advantage to create different effects. For instance if you want to add more definition to the eyebrow, you can add just a little bit of water or gel medium to your brush: you'll get a watercolour effect + variation in the color of the ink (walnut stain becomes more yellowish).
Step 6: Outlining the face and hair with the watersoluble black Stabilo All pencil and a wet brush. At this stage, she's really got her true soul...
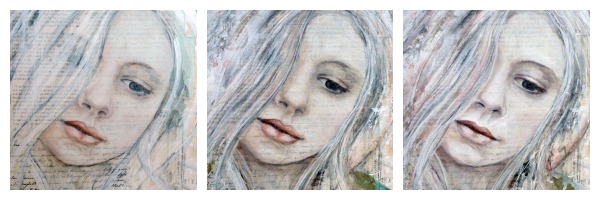
Steps 7, 8 & 9
Step 7: Hair and make-up + nose-job... using the same techniques as before.At this stage I was happy with what she had turned into. And yet, because the painting is part of a series, I put her side by side with the previous 2 paintings and found that her skin was much darker. And after a while it started bothering me. So...
Step 8: ... I thought maybe I could lighten it just a little bit... Bad idea: in seconds the face lost some of its freshness and transparency. As a result, the lips now seemed too big and the nose looked weird...
Step 9: ... which led to more messing up and making her seem older... I don't dislike this more mature look, but it's just not who I feel she's wanting to become. Make-up removal is in order...
NB: It's been so interesting for me to get all your comments and perspectives at this particular stage. What's most important to remember is that at all times I keep trusting the process and waiting to see "who" is finally going to emerge on the canvas. What I mean to say, about "messing up", is that at some stage I have felt like I knew that girl, felt connected to her, and then I didn't recognize her anymore. But she's on her way...
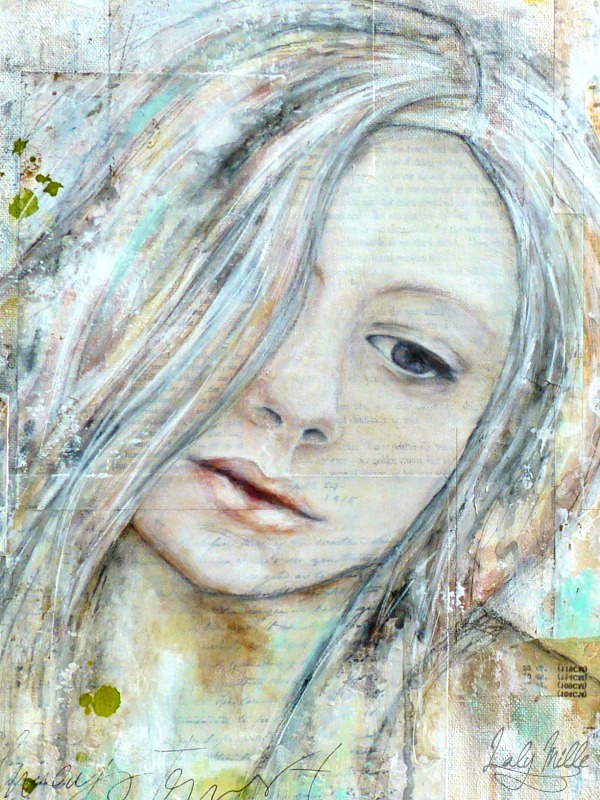
Step 10: final version!
Step 10: Here she finally is... I'm happy with how the innocent and more mature looks blended together. I have removed some of the paint on her skin and in her hair to reveal the book pages again, gone back to the first shape of the mouth and painted it a bit lighter, lightened the eyes too...
TIP: To safely remove layers of paint I use hydroalcoholic gel on a cotton bud.
As promised, here is the video showing you the whole portrait coming to life, from start to finish!
https://www.youtube.com/watch?v=k0AXpk4cXQM
I hope that you enjoyed this process and that it will inspire you to try your own mixed media portrait... Remember to let go of any expectations regarding how the face is "supposed" to look. Let it unfold and bloom naturally, and once you get a glimpse of the soul behind it, take your time, let it sit aside for a while if you need to, don't rush it. But also know that "mistakes" are part of the process and that, like all our experiences in life, they shape who we become and allow us to learn and grow. They will eventually give your portrait its own unique character once it is fully born on your canvas. And of course you can ask me any questions here in the comments or on Facebook.
NB: Enjoyed the video? HERE is another one from last year that you might like: it's a mixed media floral painting, full of blooming roses...