Art studio storage ideas

chunky paintbrushes are an invitation to play!
In Part One, I shared a tour of my new-and-improved art space: it now has several different work stations, which is such a game changer. And today we’re focusing on creative storage solutions for your art supplies! By the way, did you know I have a whole, free video series about mixed media art supplies? Click below to sign up and get plenty of ideas:
The #1 Rule… declutter!
Before we dive into the nitty gritty details, here is a rule of thumb: storing doesn’t mean hoarding! The whole point of having art supplies is to use them. They are here to help you make art, express yourself and have a ton of fun in the process. So there is absolutely no point in keeping materials that you do not enjoy using. Declutter and give them away! Before you even think about reorganizing, here are a few things to look for and ruthlessly get rid of:
Colors you don’t like at all
Collage papers that don’t feel really “you”: for instance, if you got a pad of scrapbooking paper, just keep the sheets you actually like.
Samples you got for free but never used
Stuff that doesn’t work, like those paintbrushes that have hardened because you forgot to rinse them (and that make you feel guilty every time you see them!)
The “what was I thinking?” stuff you got during a crazy bout of shopping fever, like those rubber stamps that are almost too pretty to use
The “you never know” stuff that you’re keeping “just in case”
The “for later” projects that you’ve started a while back and left aside. If the thought of getting back to them feels boring or overwhelming, instead of exciting and inspiring… don’t bother.
Make sure that your creative space is filled only with things that bring you joy and inspiration. The rest can go. Recycle what you can, and anything that is in good working order can be given away to fellow creatives or your local community center: those unused supplies will surely make someone else really happy.
art journaling supplies
In a previous posts, I told you about my new art journaling corner, which is set on a vintage rolling cart I got from my grandparents. Most of the supplies I use for art journaling are the same that I use for mixed media painting, so I needed the two stations to be close to each other. I've placed my little cart right against the side of my main painting table, which is higher. This way, the table acts as a shelf, so that my brushes and all my most-used art supplies are within easy reach, no matter where I work!
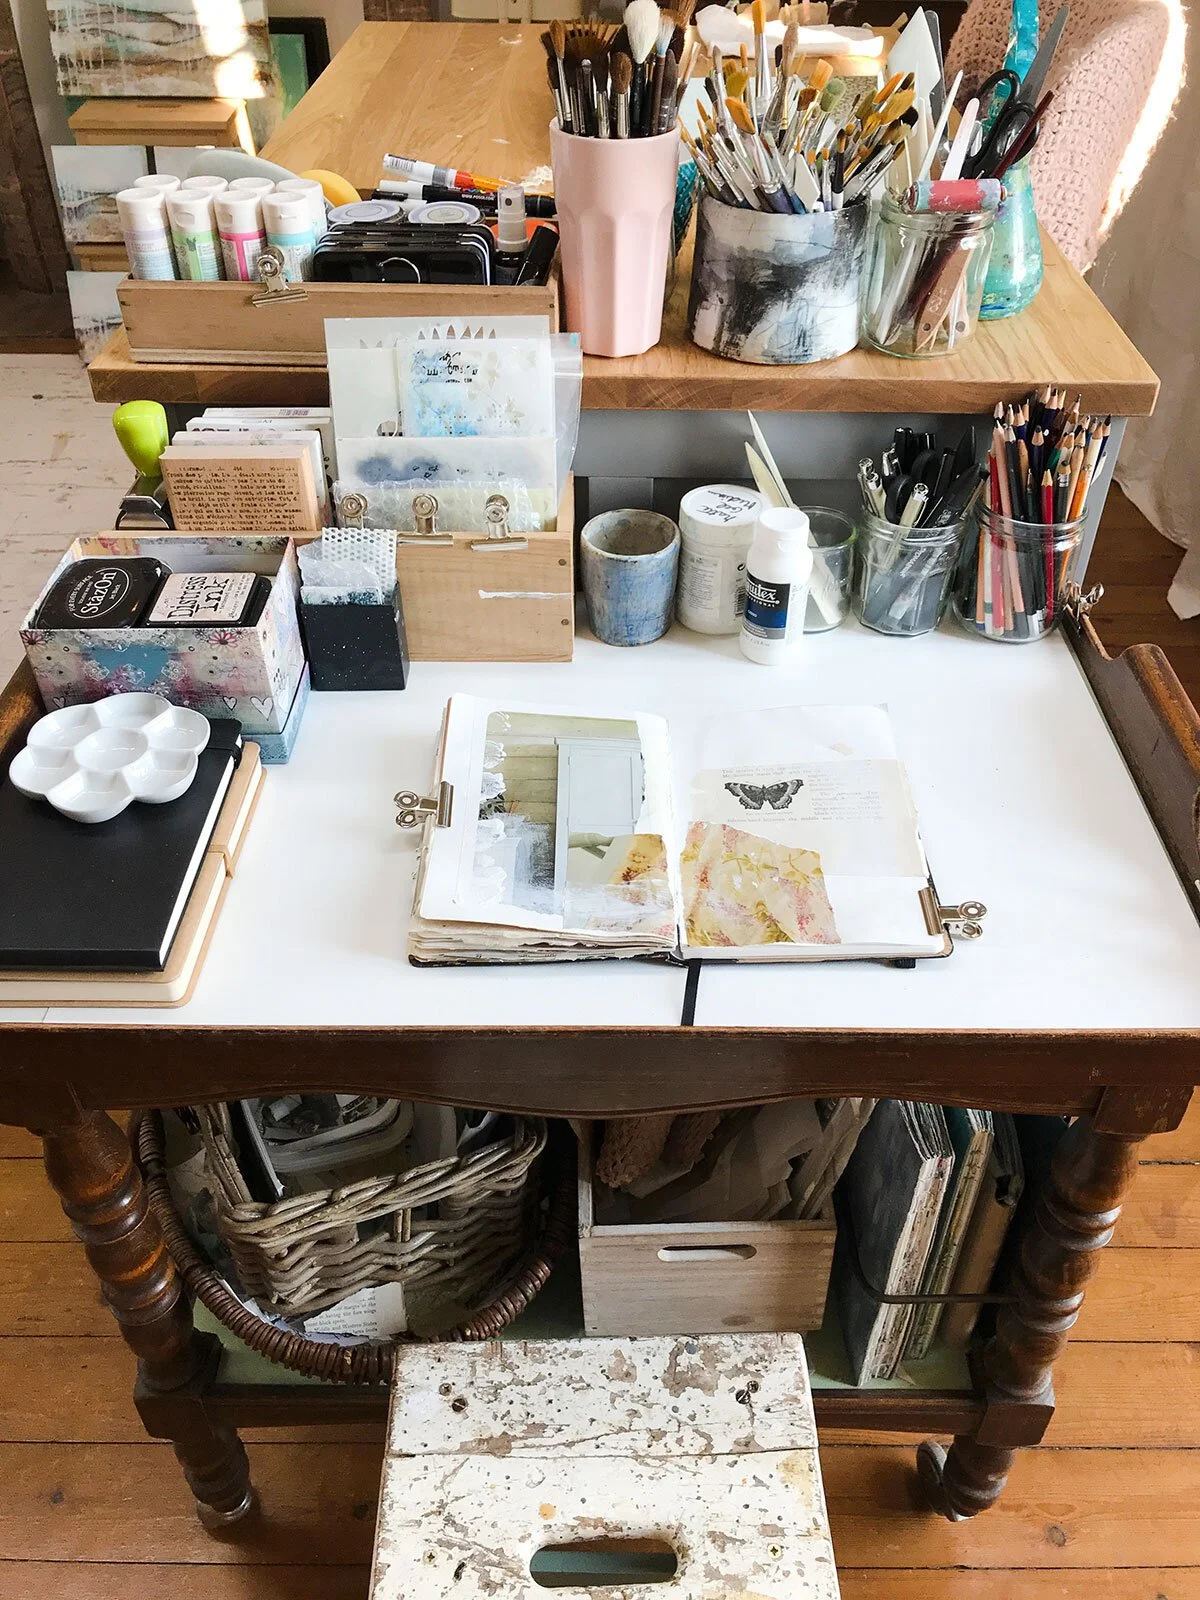
my art journaling table
The most important storage solution in my art journaling practice is a big basket where I keep all my paper scraps for collage. Not only is it super inspiring, but it’s also perfect to quickly pick up any bits and pieces after a messy session. I always find little treasures whenever I sweep the floor! I love that my basket fits perfectly in the bottom part of the rolling cart, so it’s always within easy reach. The cart also a super practical bottle-holder to hold my journals!

a big basket is perfect for all those paper scraps

perfect storage for my basket of papers and my journals
painting staples
In the common space between my art journaling table and my main painting table, are the supplies I use all the time. It’s really important to me to have my supplies in plain sight, like a constant invitation to use them! I wouldn’t be half as productive if they were cleanly tucked away in drawers and cupboards:
matte gel medium
white gesso
paint brushes
palette knives and other mark-making tools
a few favorite stamps and stencils
pens & pencils
paint markers
scissors
spray bottle
a jar of water (these days I like to use a big, pretty mug)
and a rag

paintbrushes at the ready!

my main painting space
Even though I like to keep most of my supplies on display, I’ve still added a curtain to my previously open shelves: in this new setting, they’re located behind my chair, and I feel more comfortable sitting at my table with a soft, light surface behind me. These shelves hold some larger and less-often-used supplies like bottles of varnish and extra large stencils, but mostly they are full of books, notebooks and magazines.
Now, keeping my main supplies on the side of the table, and not in front of me, allows me to work on both sides! I love to work standing, so this is a great solution for me. And the table, which is really a kitchen island, has some nice open shelves with plenty of storage space. I’m using baskets here, and on the shelves of my second table (the one for filming), all my larger papers are sorted in clear plastic boxes. Not as pretty, but hiding them behind a small curtain hung on a telescopic shower rod does the trick!

open shelves and baskets are great to keep materials within easy reach

a curtain hides plastic boxes!
color color color!
When it comes to art supplies, I believe that the best storage solutions are the ones that are both practical and inspiring, making you want to actually use them, and making it super easy. My “color cart” here really feels like a little candy shop! It is super handy to see all my colorful supplies at a glance: inks, pencils, crayons… Glass jars are great for these.
I also love art supplies that come in small containers, like my alcohol inks, because it is so easy to display them all together, which of course makes me want to use them! This little trolley sits right next to my art journaling table and my main painting table, so it’s always within reach, and I can easily roll it around the studio too, to use at my easel for instance.

i love my little color cart, so yummy!
I love to arrange my supplies in little rainbows of color. A while ago, I realized that I had this great set of coloring pencils, but because they were tucked away in their (ugly) original box, I never used them. Well, no more! Now they make me smile, and I use them all the time. Do you have a set of supplies still in their original packaging, quietly waiting for some creative fun? Take them out!

Colorful pencils feel much happier here than locked up in a box
Here is another practical and colorful idea: those ribbons used to be all tangled in a box (still, a clear box so that wasn't so bad), but now they're hanging on a vintage wooden hanger that I have nailed to the wall, and I've sorted them into a pretty rainbow! These lovely textures and colors greet me whenever I enter the studio, and I bet I will be using these ribbons a lot more in the future. Are any of your most beautiful materials hidden away? Make them a part of your decor so they can inspire you!

somewhere, over the rainbow…

I love this vintage hanger. did you know that the number three represents creativity?
And of course, I adore my paint rack, which I have been using for many years. It’s actually the side of a crib that I found on the street, combined with some curtain hooks from Ikea. They hold the paint tubes vertically, so that the paint is always easy to squeeze out, even from half-empty tubes. Something I really like in this new setting, is that my paint rack is no longer standing on the floor like it used to. I’ve set it higher on a shelf, which makes it so much easier to choose my paints and put them back. Plus, I’ve hung all my favorite, go-to colors at eye level.

my trusty paint rack
On the shelf below, there’s also a small box with compartments for my oil paints. I use oils (the water soluble kind) mostly for my paper clay sculptures. The small folding table right next to the shelf is my “dusty corner”, with another little trolley for all things plaster and paper clay (head over to my previous post to see more). As you can see, once again I have all the supplies that I need, right where I am most likely to use them!

the “dusty corner” for paper clay and plaster

oil paints are sorted by color too
Canvas storage
What takes up the most space in my studio are probably my canvases and other substrates. I like to work both big and small, and my storage solutions reflect that! For small and medium panels and stretched canvases, I love this big dresser with open shelves. The sight of all these little blank substrates feels like a whole world of possibilities!
And the larger ones, both blank canvases and finished paintings are stored in super tall shelves hidden behind curtains. I’m very lucky to have a room with high ceilings, so I’d better make the most of it!

blank substrates await on open shelves

stretched canvases and wood panels are always within easy reach

large canvases and finished paintings are tucked away behind the curtains
make it pretty!
The sight of art supplies makes me so happy and inspired. Their shapes, colors and textures are just beautiful, and it’s really fun to find creative ways to display them! There’s a mantel in my studio and I wanted to make it a decorative focal point, something that instantly inspires me, tells a bit of my story, and truly honors that this is a working space.
But I also wanted it to be useful and practical, not just decorative. So this is where I’ve placed all my bigger brushes: they look so yummy and just scream “artist space!” The small wooden drawer is for little bits of leftover ribbon and other fibers I just can’t throw away. And this is also where I display the bowls and cups that I use all the time for gel medium and varnish. On the floor next to the mantel, rolls of paper are stored in a bin. To me, they look like a big bouquet!

make your art supplies part of your decor

bouquets of brushes!
If there’s one thing I’d like you to take away from this little tour, it’s this: the way you organize your space and your materials needs to work for YOU and support you in your creative process. It needs to help you make the art you are meant to create!
Some of you might feel more creative in a super clean, tidy environment with your supplies neatly organized in cupboards and drawers, so you only take out whatever you need in the moment, and that’s totally fine!
As for me, I like my creative space to feel a bit more messy: a sweet and fun, yet organized chaos. Everything has its place, right down to the tiniest paper scrap, and this helps me stay in the flow: when I’m in the middle of a painting, I don’t want to get stuck and waste time looking for things. And I also don’t want to get paralyzed at the thought of cleaning up afterwards. Tidying up the room after a creative storm, and putting everything back where it belongs, is actually part of my ritual. I think it keeps the good vibes flowing!
What about you? How do you like to organize your creative space?
Do you have any questions about what I've shared in this post or what you've seen in the pictures? I'll be happy to help!
What storage solution you are most happy with in your own creative space?
And if you haven’t already, don’t forget to sign up for my free video series, “Mixed Media Supplies 101”: in this 5-day online workshop, I share tons of tips to help you make the most of your art supplies. I hope to see you there!